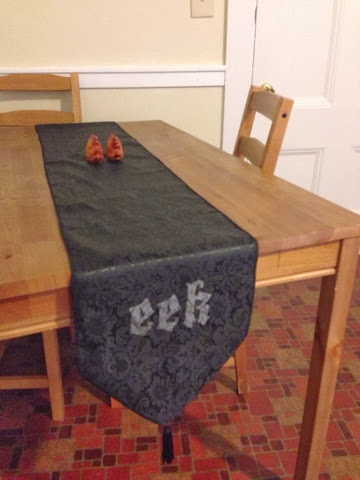
When I was rummaging through the pillow cases I spotted some similarly styled damask table cloths, table runners and napkins. I suppose if you really wanted your couch and table setting to match you could pick up all 4 items, but they seemed a bit too matchy matchy to me. I ruminated on the black damask set for a few days before deciding I wanted to whip up a Halloween themed table runner. Originally I thought I might cut up the table runners and hang smaller pieces on dowels to make banners of sorts, and I may still decide to do this, but for now, I love how my table runner turned out. It really couldn't have been an easier project.
The most time consuming part of this project was picking out the right Halloween-y inspired font to use for the table runner. You can throw "Halloween fonts" into Google and come up with a ton of free fonts to install on your computer. I had a certain vision in my mind, so I just kept searching until I found the right one. The font I used here is called Blackwood Castle and I found it on www.DaFont.com.
You can find a more detailed tutorial for freezer paper stencils I've done before here, but I'll run through the quick and dirty of how I made this below.
After I set up my design in Microsoft Publisher (I suppose I could have easily used Word too). I printed out the text in the font I'd decided on and got to work. I actually ended up mixing up the font style for each word because I really liked how the word "eek" looked in lower case letters, but hated how "boo" looked lower case. Mix it up and decide what works best for you.
I traced the letters onto my freezer paper and then carefully cut them out. Remember to save the inner pieces of your letters!! I ironed my table runner, lined up the stencil so they were both the same distance from the bottom of the points and then ironed them on - including the little inside pieces for the letters (which you can see in the B, and O's below. Once I was happy with their placement (I had to carefully peel off "eek" and realign it) I was ready to paint.
I decided to use silver paint for this project because I thought that white might be too stark on the table runner. I wanted the letters to show, but not overly pop in color.
Once the paint was dry I carefully peeled off the freezer paper and it was done!
It wasn't until I was all done that I realized that my table runner was WAY TOO LONG for our little Ikea table. It hangs off the sides nicely though so if we were having a party where we weren't sitting at the table it would hang nicely.
From this photo you can see that mine is about a foot and a half too big, but it's okay, I still love it.
Close up: I decided to go light on the silver paint because I LOVED how the damask pattern showed through the fabric. If you didn't like this, I'd recommend doing one light coat, letting it dry, and then adding more paint. It's better to add more paint in stages so that the moisture from the paint doesn't make the freezer paper lift.
Because I had all of the supplies on hand, except for the table runner, this project cost me exactly $1. Not too bad, for a sweet Halloween decoration!!
How are you preparing or decorating your house for Halloween?


No comments:
Post a Comment